- 새로운 상품
- 조립 키트
- 센서/Sensor
- 로봇/Robot
- 전자 모듈
- LED/발광다이오드
- 마이크로 관련
- 반도체
- 컴퓨터 관련
- 측정기/계측기/Tester
- 계측 키트
- 발광-수광 장치
- 무선 고주파 관련상품
- 디스플레이/Display
- 전자 공작 편리상품
- 부품 일반
- 릴레이 4.5V
- 라치 릴레이(라칭 릴레이)
- 전원일반
- 5W 급 절연 DC-DC
- 10W 급 절연 DC-DC
- 전지 일반
- 배터리/Battery
- 모터/엑추에이터
- 카메라
- 자동차용품
- 생활용품
- 해양/레저네비게이션
- Devantech
- Parallax 패럴렉스
- ELTEC
- MEMSENSE
- Peak Electronic
- PICAXE
- Phocos AG
- Vstone 과학 로봇
- 목적 별
- HAMMAR
- 의료용 분야
- 서보 Servo
- 일본 추월전자
- Sain Smart
- 051-465-7774
- OPEN: MON - FRI
- AM 9:00 ~ PM 18:00
- LUNCH TIME
- PM 12:00 ~ PM 13:00
- CLOSE
- 토요일, 일요일, 법정공휴일
- bank
- 기업 097-094280-01-012
- 예금주 : 박상근 동창이지킷
![[EI-0024] Text to Speech Synthesizer [SP03]](http://www.easykit.co.kr/web/product/big/easykit2_383.jpg)
[EI-0024] Text to Speech Synthesizer [SP03]
(해외배송 가능상품)| 상품명 | [EI-0024] Text to Speech Synthesizer [SP03] |
|---|---|
| 원산지 | 영국 |
| 판매가 | 100,000원 |
| 세액 | 10,000원 |
| 수량 |   |
| 관련상품수 | 0 |

 |
| 상품명 | 상품수 | 가격 |
|---|---|---|
| [EI-0024] Text to Speech Synthesizer [SP03] |


|
100000 ( |
|
TOTAL : 0 (0개)
할인가가 적용된 최종 결제예정금액은 주문 시 확인할 수 있습니다. |
||
이벤트
SP03 Specification
Voltage - 5v only required
Current - 35mA Standby, 60-100mA Speaking.
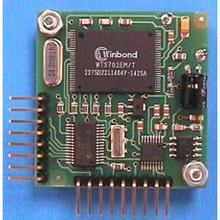
Synthesizer - Winbond WTS701EM/T
Control 1 - RS232 interface to PC (38400 baud)
Control 2 - I2C interface for easy wiring to Micro-controller.
Control 3 - 5 pin parallel input port.
Stored Speech - 30 phrases with up to 1925 total characters.
Text to Speech - Unlimited via RS232 or I2C interfaces.
Speaker - 40mm Speaker built in.
Amplifier - 325mW LM386 on-board.
Small Size - 40mm x 40mm excluding connectors.
*부과세 포함가격입니다.
SP03 Text to Speech Synthesizer
The robotics community has been without a low cost speech synthesizer chip for a long time. The ever popular SP0256-AL2 has long gone out of production, though there are a few still available. There are other multi-chip products around but none have captured the popular imagination like the Winbond WTS701. And with good reason, the WTS701 is not only a complete single chip synthesizer but also includes a text to speech processor. Given the near impossibility of producing a definitive set of rules for text to speech processing, the WTS701 performs impressively. The only downer for the hobbyist is that the WTS701 comes in a 56 lead TSOP package with pins on a 0.5mm pitch.
The SP03 module includes an audio amplifier, a 3volt regulator and level conversion to 5volts, a PIC processor to provide easy communication with your host processor and even a small 40mm speaker, along with the WTS701. Interfaces include an RS232 serial interface, I2C bus interface and a parallel interface to speak up to 30 predefined phrases. A PC program SP03.EXE is available to load the 30 predefined phrases into the SP03.
We have examples of using the speech module with popular processors.
Connections to the Speech Module
There are two connectors on the SP03 module. The 5v power supply may be applied to either of them - the other may be left unconnected.
PL1
PL2
|
RS232 Communications
To use the RS232 serial port to control the SP03, just three connections to the PC (or other host) and a 5v power supply is required - Ground, Rx, Tx and 5Volts. The modules RS232 Rx pin should be connected to the PC's Tx line (pin 3 on the DB9 socket). The SP03 RS232 Tx pin should be connect to the PC's Rx line (pin 2 on the DB9 socket). The SP03 Ground line is connected to pin 5 on the DB9 socket. The 5volt supply is not shown in the photo below.
The serial data format is 8bits, No Parity, 2 stop bits, 38400 baud.
RS232 Commands
There are 32 serial commands that can be sent to the SP03. Thirty of these (commands 1 to 30, or 0x01 to 0x1E) are used to speak one of the thirty predefined phrases. To speak any of these phrases, just send a single command byte to the SP03. When the SP03 has finished speaking it will send the command back to the PC as an acknowledgement. Don't send any commands to the module whilst it is speaking, as they will be ignored. When the command is acknowledged, the module will be ready to receive another command.
Command 128 (0x80)
This command is used to speak a line of text. It is followed by 3 control bytes, then the ASCII text, then an 0x1a character and finally a zero (0x00 or NULL). The three control bytes are the volume, pitch and speed values for the text. For every byte sent, here will be an acknowledge byte sent back from the module. It is essential that you wait for the acknowledge byte before sending the next character. Here is the sequence to speak the word "Hello" at full volume and moderate pitch and speed. Note that the volume value 0-7 is from loudest to quietest. The PIC's text buffer is 85 bytes in size, so that is the limit for a single phrase. The volume, pitch, speed and trailing NULL character take 4 bytes leaving 81 for the text.
| Command byte Transmitted to SP03 Module | Acknowledge byte returned from SP03 |
| Command 0x80 | 0x01 |
| Full Volume 0x00 | 0x00 |
| Speech Pitch 0x04 | 0x04 |
| Speech Speed 0x02 | 0x02 |
| Text 'H' | 'H' |
| Text 'e' | 'e' |
| Text 'l' | 'l' |
| Text 'l' | 'l' |
| Text 'o' | 'o' |
| NULL 0x00 | 0x00 |
| SP03 will now speak the text | 0x00 indicates text loading is complete |
Command 129 (0x81)
This command is used to read back the WTS701's status register. After sending 0x81 to the module it will respond by sending back first the low byte and then the high byte of the WTS701 status register. This may be used to determine when the WTS701 has actually finished speaking the text. You should consult the WTS701 data sheet for full details of the status bits, however a simple way to do this in C is;
| do { | |
| SerOut(0x81); | // send Get Status command |
| sts = SerIn(); | // get low byte |
| sts += SerIn()<<8; | // get high byte |
| sts &= 0x8003; | // select bits to test |
| }while(sts != 0x8001); | // and loop until finished speaking |
Command 130 (0x82)
This command is used by SP03.EXE to download the 30 predefined phrases into the PIC's Flash memory. Do not try to use it as the protocol requires that the text is sent in a compressed format. Use the configuration utility SP03.EXE instead.
All other values sent as commands will be ignored and no acknowledgement will be returned.
I2C Bus Communications
Along with the 5Volt power supply, the I2C bus just requires the SDA and SCL lines. The I2C interface does not have any pull-up resistors on the board, these should be provided elsewhere, most probably with the bus master. They are required on both the SCL and SDA lines, but only once for the whole bus, not on each module. I suggest a values of 4k7 for 100KHz and 1k8 if you are going to be working up to 400KHz or higher. If your going for higher speeds than 400KHz then you must separate all bytes transmitted over the I2C bus to the SP03 with a 40uS delay. This is to give the processor time to transfer the incoming data to the buffer. By doing this we have tested the SP03 with SCL up to 1MHz.
I2C communication protocol with the speech module is the same as popular eeprom's such as the 24C04. The SP03 only has two registers, the command register and the software revision number. To read the software revision number, first send a start bit, the module address (0XC4) with the read/write bit low, then the register number you wish to read (0x01). This is followed by a repeated start and the module address again with the read/write bit high (0XC5). You now read one byte which is the PIC software revision number and follow this with the stop bit.
| Register | Function |
| 0 | Command Register |
| 1 | Software Revision Number |
All commands and text to be spoken are sent to the command register. There are 32 valid commands, listed below:
| Command | Action |
| NOP (0x00) | No Action |
| SPKPRE 1 to 30, or 0x01 to 0x1E) | Speak pre-defined phrase |
| SPKBUF 64 or 0x40 | Speak text previously stored in buffer |
The NOP command is followed by the text that you want spoken. You may send as little or as much (up to the 85 byte limit) as you wish. A number of NOP sequences may be used to build up the buffer before the SPKBUF command is issued. The buffer is flushed after a SPKPRE or SPKBUF command is used. A text sequence is the same as for the RS232 protocol, that is, 3 control bytes, then the ASCII text, and finally a zero (0x00 or NULL). The text in the buffer may then be spoken by sending a SPKBUF command. The PIC's text buffer is 85 bytes in size, so that is the limit for a single phrase. The volume, pitch, speed and trailing NULL characters take 4 bytes leaving 81 for the text.
To say "Hello" send the following sequence over the I2C bus:
| Start Bit | I2C Start Sequence |
| 0xC4 | SP03 I2C Address |
| 0x00 | SP03 Command Register |
| 0x00 | SP03 NOP Command |
| 0x00 | Volume (Max.) |
| 0x05 | Speech Speed |
| 0x03 | Speech Pitch |
| 'H' (0x48) | Text |
| 'e' (0x65) | Text |
| 'l' (0x6C) | Text |
| 'l' (0x6C) | Text |
| 'o' (0x6F) | Text |
| 0x00 | NULL |
| Stop Bit | I2C Stop Sequence |
Note - there is no command to "speak the following text", as the RS232 interface does. If you wish to speak a single phrase then you should send a NOP command followed by the text sequence. Then, in a separate I2C bus transaction, the SPKBUF command on its own.
To check to see when the SP03 has finished speaking, you can read back the command register. Whilst speaking, it will be the command that initiated the speaking, either 1-30 (0x01-0x1E) or 64 (0x40). It will be cleared to zero (0x00) when speaking is complete and the module is ready for the next phrase.
See the examples page for examples of using the I2C bus interface with popular controllers.
Parallel Port Communications
PL2 is used to speak one of the 30 pre-defined phrases. Text cannot be sent to the parallel port for speaking. To speak any of the 30 (1-30) pre-defined phrases, apply the phrase number to the 5 bit input port SEL4 - SEL0. The numbers 0 and 31 (0x00 and 0x1F) are just parking values and to not cause any phrase to be spoken. The SP03 has pull-up resistors on the inputs so they can be left unconnected if not used. As soon as the CPU has recognised and confirmed the new input (a few uS at most) it will raise the STATUS bit to a logic 1 (high) and speak the phrase. As soon as the STATUS bit goes high, the input code may be removed by returning the input to 0x00 or 0x1F. This must happen before the unit has finished speaking or the phrase will be repeated. The STATUS bit will go to a logic 0 (low) when the SP03 has finished speaking, and this can be monitored by the host.
See the example page for examples of using the parallel port with popular controllers.
Power Up
On power up, the module will speak phrase #1, if one has been stored by the configuration program SP03.EXE
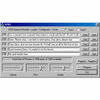
Configuration program SP03.EXE
The SP03 configuration program is shown below and can be downloaded from here. It is a PC program only, we are not able to support other platforms.
When you run the program for the first time, you should select the communications port you will be using, either COM1 or COM2. This will be remembered for the next time you run the program.
The SP03 configuration program can store 30 phrases in 6 pages of 5 phrases each. Press the PageUp and PageDw buttons to change pages. Below the 5 edit boxes for the phrases is a message/status bar and 3 sliders for volume, pitch and speed. The volume and Speed sliders work as expected but the pitch is a little strange, try the seventh position! The pitch seems out of sequence with the rest of the positions, but that's the WTS701. Below the PageUp and PageDw buttons is the program button. This will program all 30 phrases into the Flash memory of the PIC16F872 processor on the SP03.
SP03.EXE Operation
The operation of the program is fairly easy. Start by selecting the Com port and setting the Volume, Pitch & Speed sliders as shown above. Now type something into one of the edit boxes and press the "Test" button to the right of that edit box. The words you typed will be spoken. Notice that the message bar keeps track of the number of characters used so far. This is the total for all 30 phrases.
The "Test" and "Set" buttons
Both of these buttons cause the phrase to be spoken. The "Test" button uses and also stores the Volume, Pitch & Speed values set on the sliders. The "Set" button uses the Volume, Pitch & Speed values stored from the previous use of the "Test" button. Therefore you can have different Volume, Pitch & Speed settings for each of the 30 phrases. When you've all your phrases set-up and tested using the "Set" buttons you're ready to program them into the PIC16F872.
Programming the Phrases
Easy! Just press the "Program" button. Your phrases will be compressed and stored in the Flash memory of the PIC16F872 processor. The message bar will report the progress of programming. When programming is complete you will see the following screen:
Notice that the "Test" buttons are de-selected. The remaining "Set" buttons have now changed mode and when pressed will cause the phrase to be spoken directly from the pre-defined phrases that you just programmed. Click in any of the edit boxes to restore the "Test" and "Set" buttons to normal.
Baffle Cutout and Dimensions
※ 제품이 초기하자가 있을시 100% 환불, 교환 가능합니다.
- 질문이 있으시면 게시판을 이용하여 주십시오.
- 10만원 이상 구매시 무료로 배송해 드립니다.
- 재고가 없는 상품은 발주 후 10~15일 이내에 공급가능합니다.
- 부가세 포함 금액입니다.
주문방법은 게시판을 참조해 주세요^_^
결제안내
배송안내
- 산간벽지나 도서지방은 별도의 추가금액을 지불하셔야 하는 경우가 있습니다.
고객님께서 주문하신 상품은 입금 확인후 배송해 드립니다. 다만, 상품종류에 따라서 상품의 배송이 다소 지연될 수 있습니다.
교환 및 반품안내
교환 및 반품이 가능한 경우
- 상품을 공급 받으신 날로부터 7일이내 단, 가전제품의
경우 포장을 개봉하였거나 포장이 훼손되어 상품가치가 상실된 경우에는 교환/반품이 불가능합니다.
- 공급받으신 상품 및 용역의 내용이 표시.광고 내용과
다르거나 다르게 이행된 경우에는 공급받은 날로부터 3월이내, 그사실을 알게 된 날로부터 30일이내
교환 및 반품이 불가능한 경우
- 고객님의 책임 있는 사유로 상품등이 멸실 또는 훼손된 경우. 단, 상품의 내용을 확인하기 위하여
포장 등을 훼손한 경우는 제외
- 포장을 개봉하였거나 포장이 훼손되어 상품가치가 상실된 경우
(예 : 가전제품, 식품, 음반 등, 단 액정화면이 부착된 노트북, LCD모니터, 디지털 카메라 등의 불량화소에
따른 반품/교환은 제조사 기준에 따릅니다.)
- 고객님의 사용 또는 일부 소비에 의하여 상품의 가치가 현저히 감소한 경우 단, 화장품등의 경우 시용제품을
제공한 경우에 한 합니다.
- 시간의 경과에 의하여 재판매가 곤란할 정도로 상품등의 가치가 현저히 감소한 경우
- 복제가 가능한 상품등의 포장을 훼손한 경우
(자세한 내용은 고객만족센터 1:1 E-MAIL상담을 이용해 주시기 바랍니다.)
※ 고객님의 마음이 바뀌어 교환, 반품을 하실 경우 상품반송 비용은 고객님께서 부담하셔야 합니다.
(색상 교환, 사이즈 교환 등 포함)
※ 상품구입후 단순변심은 환불되지 않습니다.
A/S 안내
- 전자키트 및 센서 에 대하여 조립시 A/S 및 환불이 되지 않습니다.
- 전자키트 초기 불량일 경우 100% A/S 조치해 드립니다.
- 완제품 의 경우 외산의 제품이 대부분이여서 한달간 무상수리해드립니다.(국산품 제외)
- 완제품 국산제품의 경우 제조사의 A/S 조항을 따릅니다.
review
상품의 사용후기를 적어주세요.
게시물이 없습니다
 "19세 미만의 미성년자"는 출입을 금합니다!


- Company:동창이지킷 CEO:박상근 Business Registration NO:194-35-00364 E-commerce Permit No :2018-부산동구-0035[사업자정보확인] TEL:051-465-7774
- email :swplanet@naver.com Personal Information Manager :박상근Address:48822 부산광역시 동구 중앙대로180번길 12 (초량동) 진영B/D 401호
- Copyright ©EasyKitAll rights reserved. DESIGNED BY. MOMOI
고객님은 안전거래를 위해 현금 등으로 결제시 저희 쇼핑몰에서 가입한 PG에스크로 구매안전서비스를 이용하실 수 있습니다. [서비스가입사실확인]
 호스팅제공 카페24(주)
SSL 결제보안 인증사이트
호스팅제공 카페24(주)
SSL 결제보안 인증사이트
 공정거래위원회 표준약관사용

